|
Not edtech related, but sometimes that's okay.  With Saint Patrick’s Day just around the corner, I figured what better time than to talk about the way I’ve been teaching body paragraphs to my sixth grade ELA resource room for the past two years. While assembling paragraphs may not be a large struggle, composing them while trying to analyze and embed quotes can be tricky for students. I always felt like the students struggled when it came to putting paragraphs on paper (or in our case, Docs). I tried RACES and it worked for some, but for others it just wasn’t structured enough. For some, each writing session was either met with silence or questions. Last year, as a way to help struggling students structure their writing, I started color-coding the contents of a body paragraph. Each color was associated with a particular piece of the structure and followed a rainbow from red to purple. Red: Topic sentence Orange: Provide context (background information) for the reader Yellow: Quote starter or attributive tag Green: Evidence from the text Blue: Explanation Purple: Conclusion (restate topic sentence in an impactful way) How does it help students?It gives them a place to start. At the beginning of the year they begin to connect the essential parts of a paragraph with the colors. This connection helps them down the road when they need to figure out how to organize their ideas. It also allows them to quickly assess what they’re missing. For example, I had a student look at their body paragraph and conclude they didn’t have any “green” and immediately dove into the text to find supportive evidence. Similarly, it allows them to see the balance required to make an effective body paragraph. Too much evidence and not enough explanation is ineffective and that is something students notice. Looking at mentor paragraphs, their eyes are trained to pull apart all the paragraph pieces. By this point in the year, my students are moving away from just “do I have all the colors?” to asking themselves if they’ve done enough of each. Did they provide enough details in their explanation to show their understanding and prove their thesis? Did they make the information clear for the reader in the context? It starts off as just recognizing contents of a paragraph based on color and moves into a deeper level of understanding of their own writing. Isn't it too structured?There’s always the risk of the “formulaic” writing. “Don’t force students into a box with their writing.” And while I agree, for some students, structure is necessary. I’ve watched students freeze looking at a blank page. I’ve watched those same students jump right into their writing, letting their ideas flow with the rainbow structure. Freely writing, especially for argument or literary analysis essays, seems to make them uncomfortable and unable to express their ideas. The structure gives them a concrete place to start and a direction to take. It doesn’t take away their voice as a writer but instead gives them a structure from which their writing can grow. Eventually, students transition away from it. They begin experimenting with other ways to move around the parts of a paragraph, mixing it up and changing it to fit their style. A student asked me the other day about moving around his evidence because he thought it made more of an impact after a little bit of explanation. I’ve had students play around with their ways to introduce a quote. The structure in the beginning gave them the confidence to take other risks. Students who don't need this structure are not required to use it. Not every child needs it and it's offered as a support. If a student can compose a successful paragraph with confidence without the rainbow structure, they're not required to use it. It's always a choice. Having the skill, though, has been beneficial. Even students who feel comfortable with paragraphs have told me about how they used it in their other content areas to help guide their writing. It's been helpful in assignments where they don't feel as confident. What does it look like?My students use the highlighter tool in Google Docs to highlight their paragraphs. Take a look at some of their work! 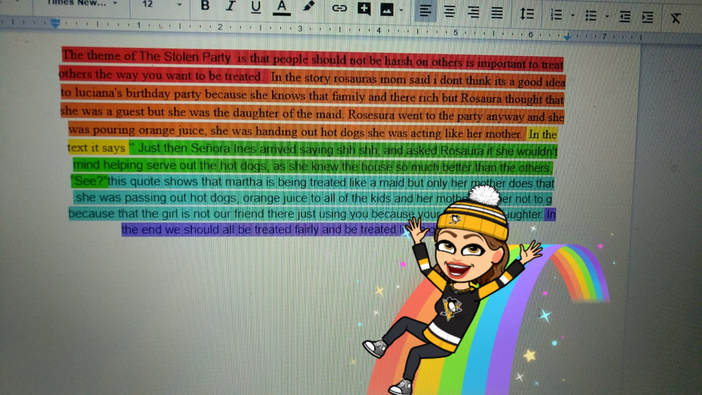 Sometimes, students end up submitting their work with the color still applied 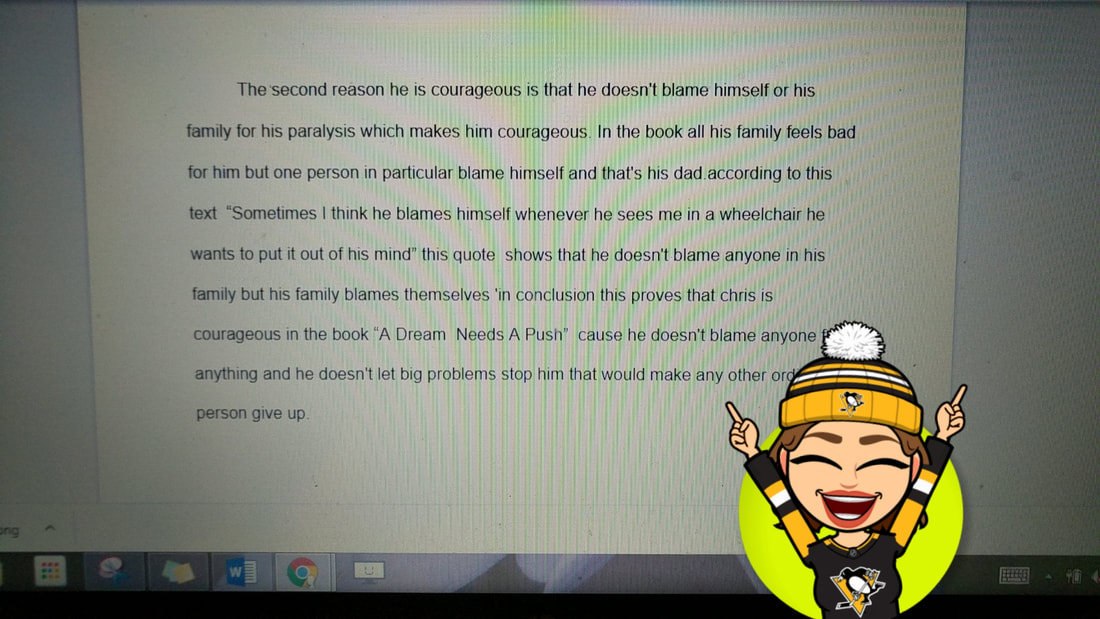 This is an example with the highlighting removed before submission
0 Comments
 I was born in 1993, which technically categorizes me as a late “millennial.” That also means that I was part of the generation that grew up through the technology and social media transition. I can’t remember a time when I didn’t have a computer or access to the internet (even if they were desktops and dial-up). I went through the middle school AIM obsession, which eventually fed into MySpace. By high school, Facebook had taken over and in college, I started my Instagram and Snapchat. While I didn’t grow up with a smartphone or tablet in hand, I had access to some form of technology. How much digital citizenship education did I have in school? None. That’s why I believe the concept is so important for our students today. In December, I had the opportunity to attend a Digital Citizenship conference held at Google’s NYC office where I got to share with other educators who believed in the importance of this education for students. And when I say education, I mean students learning about using the internet and social media in a beneficial way-- NOT scaring them away from using it. Fear was a big thing when I was in school (not that it was really that long ago). “Don’t talk to strangers online.” “Don’t post anything because someone can find and hurt you.” “Don’t overshare because your future employer will find it.” And while some of those lessons are important, it didn’t educate us about how to effectively use the digital world to our advantage.In fact, it turned us in the wrong direction. We were the generation stealing songs off the internet, breaking through so-called school firewalls to access blocked games and websites, and hiding our social media profiles from our families...so clearly all that “fear” worked. We had to figure out how to use these tools appropriately ourselves, through trial and error, and for some of us, the message is still unclear. We have a chance to actually improve this education for our next generation of students in our classrooms. Yet, for some, the fear model is still the only education set in place. After my inspiring day at Google, I pulled together what I believe are the most important aspects of digital citizenship education in schools. Staff EducationThere are many misconceptions about what digital citizenship actually is. Some people just think it’s social media safety. Others think it’s appropriately using images and videos online and copyright rules. This confusion increases the need for staff education about digital citizenship. Google has produced a short Digital Citizenship course for teachers which provides self-paced modules and assessments. Teachers can work through this course at their own convenience and discover the exact message they should be sending students about digital citizenship. Before we can expect teachers to convey the importance of being internet safe, we need to explain what it actually is. This course is just one way to make sure that all educators have the same understanding. Consistency Across the SchoolOnce everyone is educated, the message needs to be consistent. It can’t be okay to make inappropriate Google Classroom comments in one class but have it be a serious issue in another. Students shouldn’t be lying about their age to get onto a website in one class while another teacher stresses the importance of honesty. Teachers should be on a similar page about the actual function of digital citizenship in the school. A brief list of expectations of students should be provided so both the students and the teachers understand. If you want all teachers to take responsibility for encouraging the practices associated with digital citizenship, then the overarching message needs to be clear. Everyone needs to have the same understanding of the expectations. Modeling is Important“Don’t bully others online” says the educator. Then on their social media profile, you see endless negativity and harassment of others. What message does that send? My students are aware I have social media profiles; I’m 24 so it’s not surprising to them. In fact, they can easily find my Twitter profile through a quick Google search of my name. And that doesn’t bother me. In fact, I like that it’s the feed they can see when they find me. They will find positivity, sharing of ideas, and appropriate ways to engage and respond to people with differing opinions. While these posts are education-based, my students can see me as a model for effective online behavior. Then it doesn’t become a “Do as I say, not as I do.” They see that it is an active way I live my life. In the same regard, school districts with social media pages can model this behavior, as well. Showing students that each staff member is embodying the message is crucial. One Unit isn't EnoughTeaching one unit of digital citizenship in isolation does not appear to be effective. In speaking with directors, supervisors, and teachers in other districts, it is clear that the “one and done” system does not work. At the same time, many teachers feel like they cannot dedicate a whole unit of time to teaching it, as they are losing time in their content area. The solution is one that is effective and gives back actual class time: integrate it all year long. Before you have the students complete research for a project, quickly review effective search strategies and real versus fake websites. Then refer back to that mini-lesson throughout the year. Not only are the students seeing how these skills are integrated into all content areas, but they are also seeing real-life applications.
 With my elementary education undergrad background, I learned the importance of centers in the classroom. The idea of students rotating between tasks, practicing their skills, and working independently to practice was common across the lower grades. After I started working at the middle school level, I read articles and blogs about how to run a similar system with secondary students. I wanted to take the concept of centers and combine it with my paperless classroom with minimal physical setup requirements. And the Google Docs Digital Centers were born. What they look like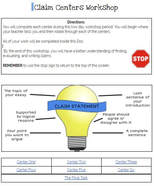 Click to view Click to view Google Docs Digital Centers provide one space for students to complete all of their center work. The first page is the table of contents, which includes the introduction with directions and a table that lists the centers. The centers are hyperlinked to different parts of the Doc so a student could click on the center number and immediately be transported down to that section. Each section contains the directions in a box and the activity, including space to write any answers, hyperlinks to outside sources, or Google Drawings for interactive components. The bottom of the center contains a stop sign or arrow, so students can click on the image to return to the top of the Doc. The Google Drawings are my favorite part of the Docs (and it’s a seriously underrated tool in general). I love how easy it is to integrate them! I can create activities by selecting “Insert” and then “Drawing” from within a Doc. From there, I can make diagrams for students to label, graphic organizers to complete, or drag-and-drop activities. Once the student has their own copy of the Doc, they are free to manipulate the Drawing. Selecting “Save and Close” instantly saves the student’s edits to the Doc for me to view. The ability for students to add their own photos through the Google Drawing option is also great. For our morpheme study, I’ll try to mix up assessments and have students brainstorm words that contain our studied morphemes and use them in a story. Students then add their own photos of them acting out scenes to accompany their writing. Using Drawings in Docs, students can easily take a snapshot and add it to the Drawing and then to the Google Doc. Steps for adding:
How to Make ItThe easiest place to start is by determining the content of each center. The creation process moves smoothly once you already have an idea of the different tasks your students will complete. Start off by writing the directions at the top section of the first page. Then, add a bookmark to it, so students can move back to it easily. Selecting “Insert” followed by “Bookmark” once your cursor is in the spot you would like to bookmark will add a blue ribbon to the side of the text. To add the table with the centers, you have to go to the Insert section of the toolbar once again. This time, you are going to “Table” and selecting dimensions that have the correct number of boxes to match your number of centers. You can choose to label your centers with names or just use numbers. I’ve done combinations of both. Use Ctrl + Enter to create a new page for each center you will create. Follow the same guidelines for bookmarking, except this time connect the bookmark to the title or center number. Once all the pages are complete, you can return to the first page and hyperlink all of the centers in the table to the correct pages for easy access. Highlight the center number, select Ctrl + k on the keyboard, and when the pop-up appears, open the Bookmarks tab and select the correct bookmark. It’s easy to determine which bookmark connects to which center when both have the same name. I like to add one box with the directions underneath each center title. If it’s consistently in the same place, it’s easier for the students to follow. I also find that it’s beneficial to leave places for students to respond and making that consistent throughout. For example, if I have students read a question on the left column of a table and respond on the right, I will use that same structure for similar tasks throughout the centers. Add all of your interactive elements, like Google Drawings, videos, etc. As you finish each section, add a stop sign or another symbol so the student knows they are finished with that task. In a Google Doc, I right-align the image so it stays in the same place. Then, if you click on the image you have added, a box with appear around it. Just like the text, select Ctrl + k on the keyboard and choose the bookmark that is at the top of your Doc, so students can return when they are finished. How it works in the classroomI push out all of my center work through Google Classroom. Make sure you make a copy for each student! I hang number signs throughout the room so students can still have the sensation of moving from center to center. It’s easy to set up and once the students know the general locations of centers, they can set up the numbers themselves. Once my students have finished the center, they get up from their place and move to another one. Sometimes, I will go into a student’s individual center Doc and highlight certain centers on their first page. In the case of students choosing their order or choosing what tasks they want to complete, this shows the students the skills that I think they need to practice the most or focus their attention. After you assign it to Classroom, just find the individual student, open their assignment, and highlight the box with the center where you want them to focus their attention. Overall, centers have become an important part of my instruction and the Docs Digital Centers have allowed me to continue with my paperless classroom while still utilizing this instructional strategy.
 Originally written as part of NJCU graduate assignment As a special education teacher, we’re faced with a lot of plans every day: Individualized Education Plans, behavior plans, lesson plans, back-up lesson plans for the students who need further clarification...the list is never-ending. Now, many districts are working on a new plan: technology. More schools are transitioning into 1:1 environments where every child will come to school equipped with a Chromebook or laptop. It’s just one more plan to add stress to any special educator. How will the students react to the switch? How can we make them individually accountable? How can I ease my students through the technology transition? Last year, I took my students from paper to entirely digital in about a month. My resource room was accustomed to working in notebooks with handouts and folders but quickly turned around to become technology pros. So, instead of having to develop yet another plan of action, I will share the plan I used to take my classified students into a paperless, technology classroom. Modeling is KeyDo as I say and as I do. The best way for students to learn is to watch you do it. The more you make technology an integral part of your daily life, the easier it will be for your students. I was an active member of the technology community, utilizing the exact same technology the students were using. I modeled how to make proper comments on Google Classroom. I modeled the use of Recap when conducting different parts of a lesson. I modeled sending appropriate emails and showed students proper methods of communication by emailing them directly. You cannot just expect students to use the technology if you are not using it in the classroom yourself. Be Consistent.My first year teaching, I started my flipped classroom. I made the mistake of putting the video resources in a bunch of different places, such as my website, EdPuzzle, YouTube, and Zaption, among others. The problem became that students did not know where to look for the homework. The key to strong technology integration is consistency. Students should know where to go for daily or typical procedures. The bell ringers, homework assigned, and resources should remain in the same place all year. In the special education classroom, it becomes difficult to switch from one place to another and it can throw students off. I made sure that Google Classroom, our learning management system, became the go-to place for everything. Students knew exactly where to access homework and Do Now assignments, assessments and resources, and even where to ask questions. Consistency made the transition a lot easier for everyone. One New Piece of Tech at a TimeThere is so much out there. Between apps, extensions, and add-ons on top of awesome websites and programs, it’s almost overwhelming for both teachers and students. Every day a new piece of technology comes out and it’s hard to for many teachers (myself included) to hold back introducing it to the students. Don’t give them too much at once. Three new Chrome extensions and two apps in one day can send students on information overload, which means no one is learning to operate any of the new tools. Instead, work with one new piece of technology at a time. Not every student needs to be using the same tool, but the key is to make sure it’s only one new tool per student. Allow the students to become so comfortable with the tool that they can operate it daily without question or concern. Then you can introduce more. By the end of the year, they’ll have a variety of brand new educational tools for creation and production. Give a Little...but Only at the BeginningI’m more flexible about technology at the very, very beginning of the year. “It’s okay that you shared it instead of uploading it to Google Classroom.” However, that only happens at the beginning. After at least three weeks of consistent technology use, I am not flexible about the procedures. Think of it like setting up regular classroom procedures. It’s okay to get the steps wrong at the beginning and learn from the errors. However, allowing errors in the middle of the year will throw your technology plan into chaos and eventually you’ll have to go hunting around for student assignments and projects. At the beginning, I remind the students of the procedure and help them complete the step they missed. After that, they’re expected to know it. Obviously, breaks cause a regression and they may need some reminders upon returning, but after that, the technical procedures are set in place. Upload it where you know it goes. Turn it in. Special education rooms require certain key steps in order to bring them into the technology-integrated classroom. Just as it might take them more time to find success in the curriculum, it might take a little longer for them to feel comfortable using the technology successfully. Use these steps to help bring your students into a digital classroom.
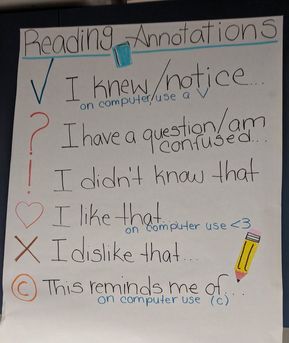
  In an effort to make ELA even more paperless for my students, I’ve been looking for easy ways for students to annotate texts on their Chromebooks. We don’t have touchscreens and only certain websites like Newsela have a built-in highlight and comment feature. Google Docs comments becoming a stream-like mess was also a concern. Enter Diigo. I had heard about Diigo as a first-year teacher 3 years ago at an EdCamp and had experimented with it, but hadn’t given it much thought. It’s been tucked away on my list of extensions, not getting my full attention. Diigo, or “Diigo Web Collector- Capture and Annotate” on the Chrome Web Store, is a free extension for Chrome browsers that allows students to highlight and make comments on any webpage. Students need to create a username upon downloading and can sign themselves in with Google to make the process quicker. Once signed in, they have access to all of the Diigo capabilities. Highlighting and Commenting All a student has to do when they are reading on a webpage is highlight the text. When they release their mouse they are prompted with three options: highlight, comment, and search. Students can choose from four highlighter colors: yellow, green, blue, and pink. Selecting the comment bubble allows students to type in a response they have to the text. For my students, this became their place to interact with the text, using our class annotation symbols and sentence starters to monitor their own comprehension and react to what they were reading. In order to delete a highlighted phrase, students just click on the highlighted words and then the trash can All of the student’s highlighted words and associated comments get saved to their Diigo library. The library is accessible by clicking on the Diigo extension icon and then clicking their username in the bottom left corner of the pop-up. It is organized by the article, with the title and URL as the header and all of the highlighted words and comments listed below it. Using the Diigo toolbar that appears on the Chrome browser when you begin annotating, you can also just add a sticky note to other parts of the page, such as on visuals. You can also annotate on screenshots or PDFs. 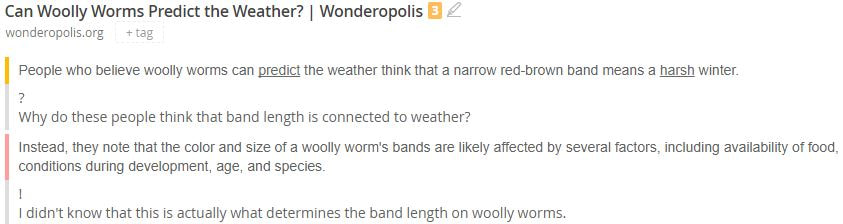 Annotations as viewed from Diigo library
Collaborating The beauty of this tool is the collaborative possibilities. I’m sure we can all name a few dozen highlighting tools, but this one sets itself apart with the sharing feature. When a student accesses their Diigo library, they have several options. They can just look through their annotations library or they can access the “My Groups” tab at the top of the page. On that page, students can create their own groups. If students are working on a collaborative research assignment, this allows all of the students to see the annotations of their peers. Students create and name their own groups and can manipulate the settings of the group, such as determining how a person can join the group and who can add new members. In my case, I have my students create their own group with me so I can see their annotations after they are working. It gives me a better sense of who needs help with a text and what progress the students are making. Once a group is made, the student will have the option to share a specific comment with their group. For example, instead of highlighting a text and just making a “private” comment. When students are typing in the comment box, the Share icon in the right corner allows the student to share that annotation with a designated group (like me) for their viewing. 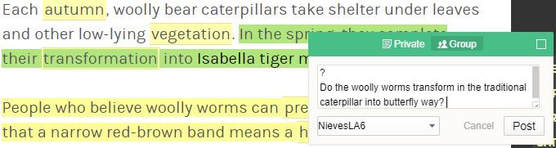 Group annotations How We Use it in ELA:
 In my two years as a flipped classroom educator, I’ve always been curious about flipping the whole-class novel. Typically in my resource room, we spent the class reading the text aloud and discussing it so the students understood the elements of the story and could analyze the text. However, this ate up a lot of time and left little room to do anything else other than read and discuss during class time. It wasn’t differentiated-- half the class was bored because we were moving too slowly and others were struggling to keep up. This year, in order to prepare my sixth graders for the demands of seventh grade, I decided to flip our final whole-class novel. Tiger Rising by Kate DiCamillo is a simple enough book. It’s a little over one hundred pages and the events are easy for the students to understand, which made it the perfect novel to use with some of my reluctant readers. Despite its short length, Tiger Rising is jam-packed with symbolism, elements of characterization, and theme-- an excellent choice for diving into analysis. So, I got two class sets for my resource rooms and off I went to plan my adventure in flipping novels. It was then that I started to panic about the model: What if the students don’t read? What if they struggle for support while reading? What are we going to do now during class? Where am I supposed to start? 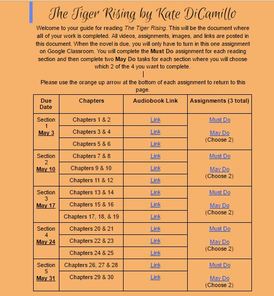 Click the image to see the hyperdoc Click the image to see the hyperdoc I’ve mentioned before that flipping the resource room hasn’t been easy. There’s not a lot of other flipped special educators out there and the only research conducted seems to favor the in-class support model. Like my preparation for the regular flipped model, I had to connect ideas from a lot of different places to make it work for my students. I had recently heard about hyperdocs, which move beyond traditional worksheets and creating interactive Google Docs for students. I knew that was where I needed to go to make this flipped novel work. My hyperdoc is an 18 page document that breaks down the entire novel for the students. I split the novel into five sections with approximately twenty-five pages in each section and at least five chapters. On the first page of the document, I liked the audiobook for each chapter from YouTube to support my auditory learners who like to follow along as they listen. I also linked all the subsequent assignments that would appear on the remaining pages. Each of the five sections required three tasks: one Must Do and two May Do assignments. Must Do tasks are questions or activities that they are required by me to complete. They focus on a particular skill in language arts that I believe they need to master or understand in order to truly get a grasp on the book. The May Do section lists four tasks connected to the events from that section. The students were responsible for choosing two tasks to complete. These were still skills that I thought the students need to learn but the variety of options differentiated the task so students could choose either what interested them or skills where they needed assistance. Some topics included: word choice, character motivation, character traits, symbolism, allusion, etc. Assignments varied in direction, some were based around inferences, predictions, or text-to-self connections. Others were more creative and allowed for students to express themselves. In one activity, students are asked to take a virtual reality tour of the Sistine Chapel and explain how what they observed connects to the character, Sistine. Since the hyperdoc was so big, I made everything in the document hyperlinked. On the initial page, students could click on the “Must Do” for a section and immediately be transported to that section of the Google Doc. At the end of each section’s tasks, student clicked an orange arrow to return to the top of the page. A large document can seem overwhelming and I wanted students to have no question about where they were supposed to go after reading (plus, it made grading each section easier on me). I created a video to help students as they moved through the hyperdoc at home. They were given a week to complete each section. Some came to me during academic assistance (our version of study hall) to work on the assignment each week, with most finishing in about two days. After each of the five sections, I gave them a grade and feedback on their work. During the week, we worked on activities and discussions that connected to what the students had been reading at home. We wrote open-ended questions for each other and answered them around the room on the desks with Expo markers. We completed characterization dodecahedrons where the students determined the character traits and what type of character each person in the story represented. We created ABC books and went through the entire alphabet, using alphabetical words and phrases to represent important parts of the novel. We created symbolism presentations where the class chose a symbol and taught the class to understand the meaning of that symbol, like the tiger, suitcase, Sistine’s dresses and name, and Rob’s rash. Some days, we just engaged in deep discussions about character motivations and the events of the plot, making text-to-world connections and bringing in aspects of our own lives to understand the situations of the characters. For the most part, the students completed the work each week for the novel. In traditional flipped classroom fashion, I did a quick post-assessment to see if the students understood what they had read and used that information to place groups, create discussion questions, or adjust the focus of the lesson of the day. While there were several students initially who did not complete the reading, once they saw they were missing out on valuable experiences and activities with their classmates because they had not read, they jumped on the bandwagon to complete the assignments. Some important things I learned about flipping the whole class novel:
Overall, the flipped classroom novel in the resource room was successful. I don’t think I’ve ever had a group of students understand a novel to such a high caliber and have as insightful and analytical discussions about the text. My resource room said they did not feel overwhelmed with what was provided and definitely felt like connected with this novel and the work more than they have in previous units. Verdict? Success! Can't wait to use it again next year!
Over these first two years of my teaching career, I’ve devoted a lot of my time to Google Classroom. Looking back at the time I spent unit and lesson planning as an undergrad, it’s a wonder I ever planned anything that didn’t involve the platform. I’ve vouched for the awesomeness of Classroom at conferences and workshops and just in casual technology chit chat, but it wasn’t until a few days ago I realized the reason behind my commitment. Google Classroom is my physical classroom.
As a special education teacher, I’m aware of the classroom issues that this area of education faces. More specifically, the lack of your own physical space. As special educators, we’re likely to share rooms (sometimes with 3 other people: shout out to my awesome roommates). For me, I’m fortunate that my resource room periods are taught within my home space, the room where my desk is located. For others, who organize their classroom on a cart, it’s not so easy. The act of shifting teachers in an out of a room can be difficult. It means setting up desks in a neutral position for the different teaching personas of the people in your room. It means you can’t write down your day’s agenda, Do Nows, or homework assignments on the board. Even things like greeting students at the door as they enter can be taken for granted because you’re racing around the school. I’m thankful for the days I arrive a second before the final bell rings. But Google Classroom changed that. It provided me with a digital space to act as my physical classroom. No Physical Classroom Problem: Can’t Leave Work on the Board For awhile I was obsessed with those creative and interesting Do-Now or Start Up activities. The ones where the teacher draws a design and pictures on the board and prompts the students to get thinking as soon as they walk into the room---but in a nontraditional way. I love the ones like “Way back Wednesday: What’s your favorite thing we’ve done so far this year.” They’re adorable but hard to do when you don’t have a board to draw on in the morning. Google Classroom Solution: Digital Warm-Ups Either I have something ready to go as soon as the students enter the room, or the rest of the period is total chaos. The problem is I’m not there to get them started. I needed a solution or a way for me to be there without really being there. So, I started using daily warm-ups, or daily challenges, to give the students something to do...on the computer. My class was expected to come in, get on a laptop, and complete the question or activity on Google Classroom, even if I wasn’t in the room yet. Last year it really took off and became a part of our daily procedure. No Physical Classroom Problem: Minimal Classroom Resources When you’re on a cart, or share a room, you’re limited in terms of space. You can’t have a section of the room where students look for absent work or a place to write down the homework. And sure, you can make some accommodations, like how I hung a whiteboard near the clock on our classroom wall to put my daily objective and homework assignments, but it doesn’t take away the fact that there are things in the room you will not have. And for the teachers in more than one classroom, this issue is even more apparent. Google Classroom Solution: About Section The About section of each Google Classroom is a fantastic--yet often underutilized--feature. I remember the first time I asked my students to refer to it at the beginning of this year. I was met with a lot of “I didn’t even know this existed!” But it’s actually proven to be very useful for classroom procedures as a replacement for physical classroom space. For my gamified classes, it’s their place to check out the leaderboard, look at their gaming profiles and badges, and track their badge opportunities. It’s where they sign out books from the classroom library. It’s also where they find links, attachments, and templates for things we always use. Anything I’d put around the room for frequent easy access is automatically uploaded into this section. And the students know exactly where to go. Furthermore, as far as the “absentee area” goes, Google Classroom’s stream itself is where my students go to find all the work they’ve missed. No Physical Classroom Problem: Cleaning Up After Class Running off when the students do (or a few minutes after) means there’s not much time to disassemble things, tidy up papers, and put things back in order before leaving for your next class. When you’re using someone else’s room, you’re rushing to put things back the way you found them and if you’re one of those teachers that’s into flexible seating and collaboration (like me), you have to stop class earlier than usual to bring the desk back to functional order. In that panic of moving and running, things get lost. Papers get jammed into my bag and things likely get lost in the shuffle. Google Classroom Solution: Log Off the Computer It could also be a valid argument for going digital-- nothing to clean up. Essentially with Google Classroom, you close that laptop and you’re all set. There’s no papers to collect. No worrying if I misplaced any student work as I leave the room. Everything is saved neatly in my Google Classroom for that class period and there’s absolutely no chance of misplacing it. I hear there’s a great art to organizing a cart: developing specific places for different resources and materials. But with Google Classroom, the organization is already done for you. No Physical Classroom Problem: Losing Positive Environment and Atmosphere Let’s face it. One of the most important aspects of the classroom is the atmosphere. Without a teacher’s touch, a classroom is just bare walls and empty desks. It takes a teacher to put decorations on the walls and create an accepting environment. But the problem persists: if it’s not your room, how do you make it your own? How can you get the class to mimic your teaching style? How can you get the students to feel comfortable and relaxed? Google Classroom Solution: Create a Welcoming Space The immediate assumption about your Google Classroom is that it has to be cold and unfeeling. “It’s just a place to distribute assignments and share resources, right?” No. It can be colorful and exciting and embracing. A movement has been going around where people make their class header a picture of their students or even one “Student of the Week” each week of the year. That within itself creates a welcoming image. I like to mix up the academic work with personal accomplishments and praise. A Do Now question doesn’t have to be academic. It can simply be a chance for students to share what they did over the long weekend and then comment on each other’s posts. I post exceptional student work and give them praise for their accomplishment. Other students will chime in and add a comment praising the student, too. You’d be surprised how much students like to give each other positive feedback. In ELA it can be so “negative” with revisions that it gives the students the chance to genuinely be proud of each other. This allows your Google Classroom to have a positive feel, where students feel comfortable making mistakes and learning from them or where they embrace taking risks. If a particular student earns a special badge, I’ll post the badge as an announcement and celebrate the student. In addition, now that Google Classroom has the differentiation component, I can push out individual praise to each and every student. I can pop on their stream on a random day with a little motivator if they’re having a rough time with something. It’s personal, it’s private but it promotes the idea of a positive learning space...all without decorations on the walls. Although it goes without saying, it takes a teacher to build a classroom, not technology. But it definitely doesn’t hurt to have Google Classroom on my side to act as my physical space when I need it. Google Education On Air on a bright and sunny Saturday. I've been logged on all day. Watched all the keynote speeches. Tried to go to as many breakout sessions as I possibly could. Met some awesome educators from all over the world. There are currently 10+ pages in my EdTech PD notebook dedicated solely to info from this event. I haven't left my living room all day. My eyes have been non-stop on the screen. Back and forth between Twitter and the sessions. And it was totally worth it. While I'm coming down from tech information overload, I figured I'd debrief and share some of my favorite things I learned and things I'll be trying out ASAP in my classroom (because my students don't think I'm crazy enough) Google Sheets Add-On: Essay MetricsAs soon as @EdTechnocation presented this add-on, my mind immediately began turning and thinking about how I could use this in the classroom. Once the add-on is installed, it can import information from Drive files or Google Classroom assignments. It goes through the files, exporting specific information about each individual one. In this case, I tested it with one of my 6th grade RC personal narrative assignments. It gives you a lot of information about each student including, word count, number of sentences without capital letters, sentence count, number of paragraph, sentences per paragraph count, ARI reading age (in years), number of revisions, and number of simple and complex connective words. Honestly, that's beautiful. I can totally see this making data analysis on student written expression a little easier. I can see, without even opening the Docs, some of the issues my students were having. Too few sentences. Too many sentences per paragraph. Run-on sentences. Fragments. Capitalization. I could have used this information to plan individualized mini-lessons and correspondin centers. I also think it might be an interesting thingto show the students so they can see their progress. 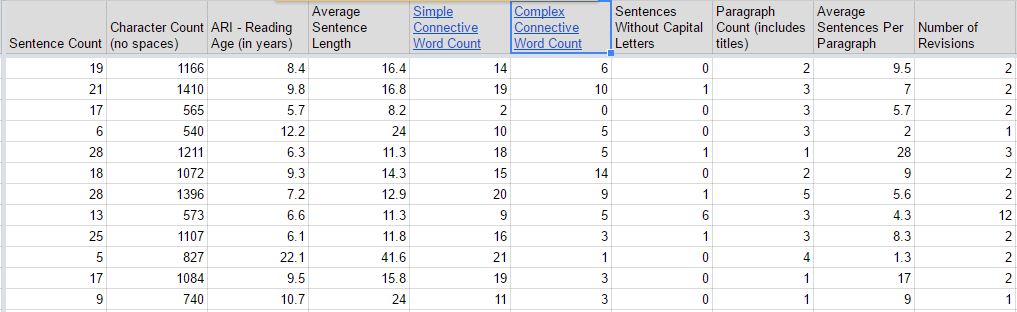 Docs Add-On: Highlighting ToolIn the same session, the Highlighting Tool add-on for Docs was discussed. Highlight within a Google Doc and the highlighted text is exported into a separate Doc and organized based on color. Perfect for text evidence in an article or research! I'm about to review the components of a literary analysis body paragraph this week using the rainbow color strategy. I might have the students add this so they can highlight each component of the mentor paragraphs with its designated color with the highlighter. Then they'd have a whole separate file of sentence starters, bank phrases, and other examples to help with their body paragraph composition. New Google Sites > Old Google SitesThe only Google feature I've heard the most complaints about is Google Sites. It definitely wasn't built for teachers. The new Sites changes that. Set up in a drag-and-drop format, it is a lot easier to maneuver through and use. I played around with it after it's release and I definitely love it more. If you haven't experimented with it yet, do it now. I guarantee you will be happier. Side Note: Google Sites will not be releasing the migration tool for the old Classic Sites until 2018. Voice Typing & Leaving CommentsI'm a huge fan of Docs Voice Typing (and it's update). Most of my students use it to take notes and type their papers and projects. However, until viewing @ericcurts' tutorial on Docs Feedback, I didn't know you could use it to leave comments. When reading a student's paper, enable your voice typing. Highlight the portion of the text where you want to focus. Say clearly "Insert Comment" and then the comment bubble will appear, ready to type the words you dicate as speech-to-text. Going to make longer essay comments so much easier. Screencastify and CommentsIn the same session, Eric talked about using Screencastify to record comments and sugestions and then sharing that link with the students. As a frequent user of the extension as a component of my flipped classroom and an occassional Kaizena voice comment user, I never thought of that idea. For students requiring extensive changes and suggestions for their writing, I can see the benefits of recording a video through Screencastify and then sharing the Drive link in a comment. Since my students are going to self-pace their way through their literary analysis comparative essay during this unit, this might be a great way to combat the differences in conference schedules. Students can view the video, make the corrections, and continue on their self-paced essay journey. Clyp.itSimple premise: hit record and starta talking, but I can totally see this being awesome in class. I'm thinking about using it for discussions. Sometimes talking becomes one-sided with certain students dominating the conversation. I'd love to have each one reflect on their reading with this tool and then save the URL and share it under a question on Google Classroom. The students who need the extra processing time will receive what they need and the students hesitant to participate will come to the discussion table with at least one thing to say. I also loved the idea of using it to record something they've written during Writing Workshop and then being able to share it with their parents or family members.
 At the beginning of the weekend, while I was working on some of my PD presentations on Slides, I noticed the new little “Explore” icon that kept popping up in the right corner of my screen. As if demanding my attention and begging for me to click on it, I took a break from my work to explore what the newest Google feature. "Explore" is available on Google Slides, Docs, and Sheets. The purpose of the program is to provide recommendations in order to make the programs easier to use. Design Slides Presentations with Ease.
 It's a lot easier to create your own Slides templates, now! I think this will make people more inclined to design their own customized templates as opposed to simply using the background colors and themes that come with Slides. I'm also excited because now my students will have more control over their presentations! Adios, Formulas. Using Explore in Sheets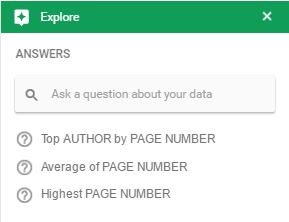 I'm not the biggest fan of math (which is why I spend most of my day in ELA), so Sheets has always intimidated me a little. Sure, it's great for lists, but the functions and math formulas freaked me out a little. I was always afraid of the error messages. Explore makes this process a little easier. Now, you can sort data by words not just formulas. You can ask explore questions about your data. For example, when looking at a student log of how many books they've read, instead of embedding a formula for total page number, I can type "How many pages were read?" and the answer will automatically appear. Explore creates general questions that you might have, but you can also type in a question yourself. For my Sheets with data, like my Gamification Leaderboard, it generates graphs automatically so I can visually see the information being presented. I can see a bar graph or histogram of the amount of experience points my students have. Makes Sheets a whole lot less intimidating Side Note: You can also change the colors and formatting of the Sheet. 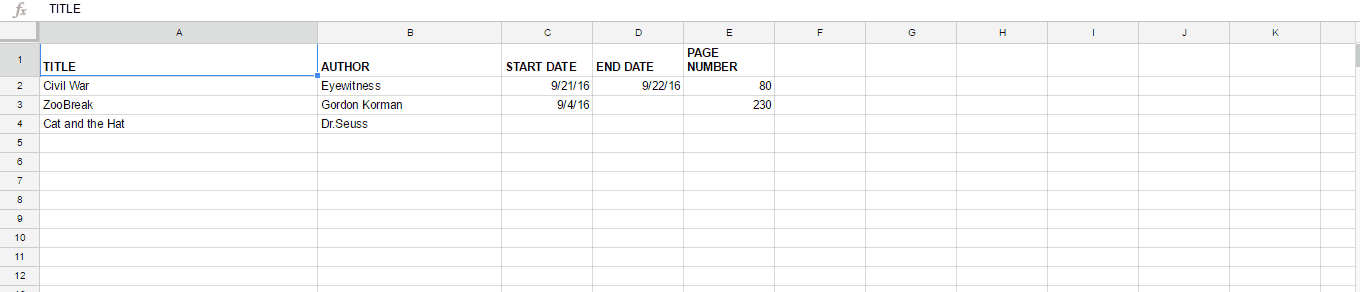 Explore in Docs. Hello, Templates!The Explore feature expands on what was formerly the Google Research Tool in Google Docs. Based on the content in your document, it will generate instant suggestions for websites and links that could be of potential help. It also goes through your Drive to find other Docs, Slides, or resources that have similar ideas to the ones in your Doc. You can also simply search your Drive or the web without leaving your document. Clicking on an outside resource will open a new window that will show the entire text, but the key quotes and phrases will automatically appear in the box.  I'm already thinking about how this will make research for expository and argument texts easier, especially when students are saving articles and links to their Drive! If you get the chance, check out Google's Explore feature. Let me know what you think of it or how you're thinking of using it for yourself or your classes! I can't believe three weeks have already gone by.And I'm super excited with my classes this year. This year I'm in the sixth grade resource ELA classroom and, as of right now, I'm loving the vibes coming from all of my students. We kicked off the year with an introduction to gamification. Our class theme is social media so all of our game elements revolve around that concept. I figured it was appropriate in the Snapchat/Instagram obsessed culture of middle school. My students have been extremely involved in the process and it seems to be going well...so far. The "Profiles"Our profiles where we show off our achievements and badges look like mock-Instagram pages. I let the students choose the amount of followers they have (which resulted in some saying one billion, but whatever). The students spent the first day creating their username and look-a-like Bitmoji to use as their profile picture. As per popular culture, there was a lot of dabbing. The profiles are now locked and uploaded onto our "About" section on Google Classroom. When students have a free moment they like to go through their class "Instafeed" and look at all of the new badges. 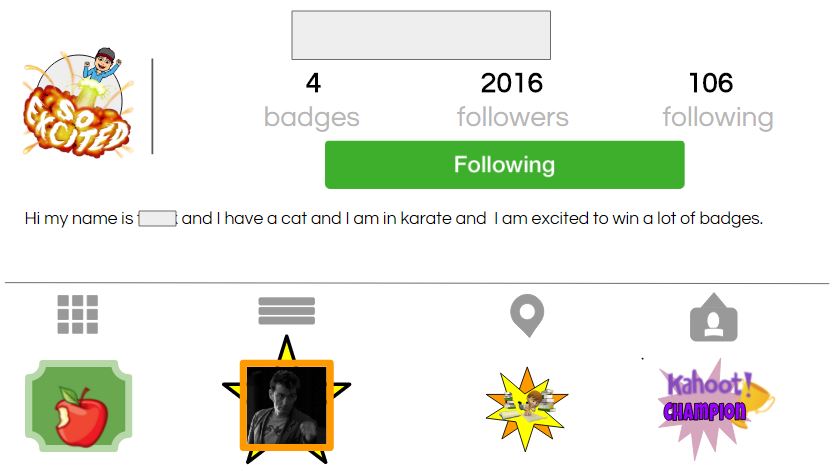 Example of a student profile Accumulating "Likes"In keeping with the social media theme, I changed experience points to "Likes". When students earn certain badges, follow class procedures, etc., they are awarded a designated amount of points. These points are accumulated throughout the year and are tracked on a "Trending Now" leader board on my class website. Students are listed by their username and not their real name (although some did choose their real name because they wanted the world to know they were trending the most). Likes can be traded in at different points in the year. They "cash in" for things like listening to music during independent work or changing seats. They can also opt to pool their "Likes" together and earn a whole class prize, like using our outdoor classroom. Using the points system has helped with students remembering to bring all of their necessary materials and getting to class on time. I've had less students "forgetting" to bring notebooks and independent reading books. Students have even mentioned that they were headed to class and realized they were missing some of their required things, which is awesome. Even students who do occasionally forget will immediately realize their mistake. Accomplishing "Achievements"In order to reward students for going over and above or completing a hard challenge, I developed badges that correspond to different things throughout each unit. Some things are procedural, like getting a positive comment from an outside teacher or staff member. Some things are academic, like receiving a perfect score on an assessment. I try not to reward students for things they are expected to do, like completing assignments, but rather show them that I notice and appreciate the exceptional things that they do. I handed one out the other day because a student dropped everything to rush over and help a classmate who had come in late and missed a lot of our assignment set-up. Sometimes the achievements are silly, like being the 1st place champion in a Kahoot review game. I try to create badges so that someone receives one at least once per day and that everyone has an equal shot. My achievement badges are created on Google Drawings and distributed through Google Classroom with a congratulatory post. I typically add the badge to the student's profile and they can check it out in the About section of our Classroom page. I do hold students accountable for some badges. For example, in our book challenge scavenger hunt, students are given a badge if they read a book that fit into one of the hunt items. Students are not rewarded by the amount of books read, but rather by crossing a hunt item off their list. For example, a graphic novel, a book published the year they were born, a book a friend recommended, etc. Students are required to submit the book title to me and tell me what hunt item it fits in order to receive the badge. Informing me is their responsibility. Oh, and my GIF obsession is strong with these badges. The majority of them include some sort of moving component, since I just think it's cooler that way. Badges L to R: "Be our Guest"- exceptional behavior when a guest is in the classroom, "Center Stage": volunteering to read your writing in front of the class, "Compliment Creator": get a compliment from a Sparta Middle School staff member (Discounting me or our paraprofessionals) What I didn't Realize Would Happen...
I'm excited to see how it progresses throughout the year! |
Katie Nieves@Ms_Katie Nieves Archives
December 2017
Categories |


 RSS Feed
