  In an effort to make ELA even more paperless for my students, I’ve been looking for easy ways for students to annotate texts on their Chromebooks. We don’t have touchscreens and only certain websites like Newsela have a built-in highlight and comment feature. Google Docs comments becoming a stream-like mess was also a concern. Enter Diigo. I had heard about Diigo as a first-year teacher 3 years ago at an EdCamp and had experimented with it, but hadn’t given it much thought. It’s been tucked away on my list of extensions, not getting my full attention. Diigo, or “Diigo Web Collector- Capture and Annotate” on the Chrome Web Store, is a free extension for Chrome browsers that allows students to highlight and make comments on any webpage. Students need to create a username upon downloading and can sign themselves in with Google to make the process quicker. Once signed in, they have access to all of the Diigo capabilities. Highlighting and Commenting All a student has to do when they are reading on a webpage is highlight the text. When they release their mouse they are prompted with three options: highlight, comment, and search. Students can choose from four highlighter colors: yellow, green, blue, and pink. Selecting the comment bubble allows students to type in a response they have to the text. For my students, this became their place to interact with the text, using our class annotation symbols and sentence starters to monitor their own comprehension and react to what they were reading. In order to delete a highlighted phrase, students just click on the highlighted words and then the trash can All of the student’s highlighted words and associated comments get saved to their Diigo library. The library is accessible by clicking on the Diigo extension icon and then clicking their username in the bottom left corner of the pop-up. It is organized by the article, with the title and URL as the header and all of the highlighted words and comments listed below it. Using the Diigo toolbar that appears on the Chrome browser when you begin annotating, you can also just add a sticky note to other parts of the page, such as on visuals. You can also annotate on screenshots or PDFs. 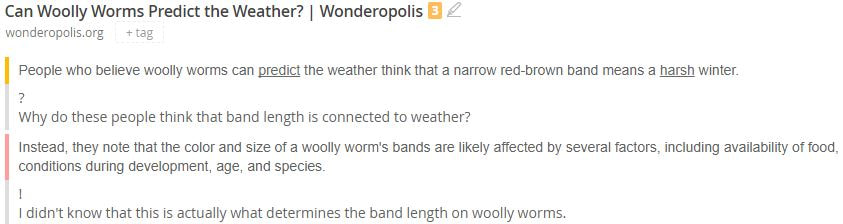 Annotations as viewed from Diigo library
Collaborating The beauty of this tool is the collaborative possibilities. I’m sure we can all name a few dozen highlighting tools, but this one sets itself apart with the sharing feature. When a student accesses their Diigo library, they have several options. They can just look through their annotations library or they can access the “My Groups” tab at the top of the page. On that page, students can create their own groups. If students are working on a collaborative research assignment, this allows all of the students to see the annotations of their peers. Students create and name their own groups and can manipulate the settings of the group, such as determining how a person can join the group and who can add new members. In my case, I have my students create their own group with me so I can see their annotations after they are working. It gives me a better sense of who needs help with a text and what progress the students are making. Once a group is made, the student will have the option to share a specific comment with their group. For example, instead of highlighting a text and just making a “private” comment. When students are typing in the comment box, the Share icon in the right corner allows the student to share that annotation with a designated group (like me) for their viewing. 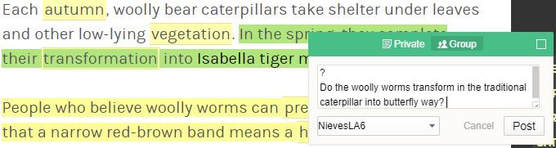 Group annotations How We Use it in ELA:
0 Comments
Leave a Reply. |
Katie Nieves@Ms_Katie Nieves Archives
December 2017
Categories |

 RSS Feed
