 Originally written as part of NJCU graduate assignment As a special education teacher, we’re faced with a lot of plans every day: Individualized Education Plans, behavior plans, lesson plans, back-up lesson plans for the students who need further clarification...the list is never-ending. Now, many districts are working on a new plan: technology. More schools are transitioning into 1:1 environments where every child will come to school equipped with a Chromebook or laptop. It’s just one more plan to add stress to any special educator. How will the students react to the switch? How can we make them individually accountable? How can I ease my students through the technology transition? Last year, I took my students from paper to entirely digital in about a month. My resource room was accustomed to working in notebooks with handouts and folders but quickly turned around to become technology pros. So, instead of having to develop yet another plan of action, I will share the plan I used to take my classified students into a paperless, technology classroom. Modeling is KeyDo as I say and as I do. The best way for students to learn is to watch you do it. The more you make technology an integral part of your daily life, the easier it will be for your students. I was an active member of the technology community, utilizing the exact same technology the students were using. I modeled how to make proper comments on Google Classroom. I modeled the use of Recap when conducting different parts of a lesson. I modeled sending appropriate emails and showed students proper methods of communication by emailing them directly. You cannot just expect students to use the technology if you are not using it in the classroom yourself. Be Consistent.My first year teaching, I started my flipped classroom. I made the mistake of putting the video resources in a bunch of different places, such as my website, EdPuzzle, YouTube, and Zaption, among others. The problem became that students did not know where to look for the homework. The key to strong technology integration is consistency. Students should know where to go for daily or typical procedures. The bell ringers, homework assigned, and resources should remain in the same place all year. In the special education classroom, it becomes difficult to switch from one place to another and it can throw students off. I made sure that Google Classroom, our learning management system, became the go-to place for everything. Students knew exactly where to access homework and Do Now assignments, assessments and resources, and even where to ask questions. Consistency made the transition a lot easier for everyone. One New Piece of Tech at a TimeThere is so much out there. Between apps, extensions, and add-ons on top of awesome websites and programs, it’s almost overwhelming for both teachers and students. Every day a new piece of technology comes out and it’s hard to for many teachers (myself included) to hold back introducing it to the students. Don’t give them too much at once. Three new Chrome extensions and two apps in one day can send students on information overload, which means no one is learning to operate any of the new tools. Instead, work with one new piece of technology at a time. Not every student needs to be using the same tool, but the key is to make sure it’s only one new tool per student. Allow the students to become so comfortable with the tool that they can operate it daily without question or concern. Then you can introduce more. By the end of the year, they’ll have a variety of brand new educational tools for creation and production. Give a Little...but Only at the BeginningI’m more flexible about technology at the very, very beginning of the year. “It’s okay that you shared it instead of uploading it to Google Classroom.” However, that only happens at the beginning. After at least three weeks of consistent technology use, I am not flexible about the procedures. Think of it like setting up regular classroom procedures. It’s okay to get the steps wrong at the beginning and learn from the errors. However, allowing errors in the middle of the year will throw your technology plan into chaos and eventually you’ll have to go hunting around for student assignments and projects. At the beginning, I remind the students of the procedure and help them complete the step they missed. After that, they’re expected to know it. Obviously, breaks cause a regression and they may need some reminders upon returning, but after that, the technical procedures are set in place. Upload it where you know it goes. Turn it in. Special education rooms require certain key steps in order to bring them into the technology-integrated classroom. Just as it might take them more time to find success in the curriculum, it might take a little longer for them to feel comfortable using the technology successfully. Use these steps to help bring your students into a digital classroom.
0 Comments
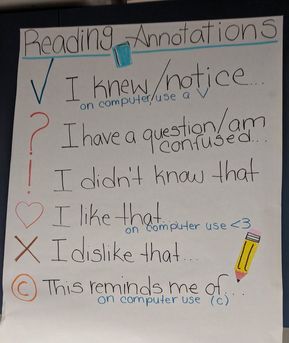
  In an effort to make ELA even more paperless for my students, I’ve been looking for easy ways for students to annotate texts on their Chromebooks. We don’t have touchscreens and only certain websites like Newsela have a built-in highlight and comment feature. Google Docs comments becoming a stream-like mess was also a concern. Enter Diigo. I had heard about Diigo as a first-year teacher 3 years ago at an EdCamp and had experimented with it, but hadn’t given it much thought. It’s been tucked away on my list of extensions, not getting my full attention. Diigo, or “Diigo Web Collector- Capture and Annotate” on the Chrome Web Store, is a free extension for Chrome browsers that allows students to highlight and make comments on any webpage. Students need to create a username upon downloading and can sign themselves in with Google to make the process quicker. Once signed in, they have access to all of the Diigo capabilities. Highlighting and Commenting All a student has to do when they are reading on a webpage is highlight the text. When they release their mouse they are prompted with three options: highlight, comment, and search. Students can choose from four highlighter colors: yellow, green, blue, and pink. Selecting the comment bubble allows students to type in a response they have to the text. For my students, this became their place to interact with the text, using our class annotation symbols and sentence starters to monitor their own comprehension and react to what they were reading. In order to delete a highlighted phrase, students just click on the highlighted words and then the trash can All of the student’s highlighted words and associated comments get saved to their Diigo library. The library is accessible by clicking on the Diigo extension icon and then clicking their username in the bottom left corner of the pop-up. It is organized by the article, with the title and URL as the header and all of the highlighted words and comments listed below it. Using the Diigo toolbar that appears on the Chrome browser when you begin annotating, you can also just add a sticky note to other parts of the page, such as on visuals. You can also annotate on screenshots or PDFs. 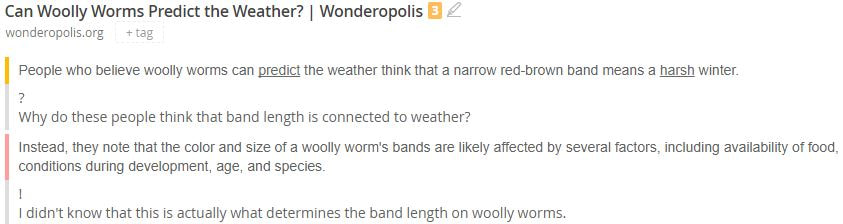 Annotations as viewed from Diigo library
Collaborating The beauty of this tool is the collaborative possibilities. I’m sure we can all name a few dozen highlighting tools, but this one sets itself apart with the sharing feature. When a student accesses their Diigo library, they have several options. They can just look through their annotations library or they can access the “My Groups” tab at the top of the page. On that page, students can create their own groups. If students are working on a collaborative research assignment, this allows all of the students to see the annotations of their peers. Students create and name their own groups and can manipulate the settings of the group, such as determining how a person can join the group and who can add new members. In my case, I have my students create their own group with me so I can see their annotations after they are working. It gives me a better sense of who needs help with a text and what progress the students are making. Once a group is made, the student will have the option to share a specific comment with their group. For example, instead of highlighting a text and just making a “private” comment. When students are typing in the comment box, the Share icon in the right corner allows the student to share that annotation with a designated group (like me) for their viewing. 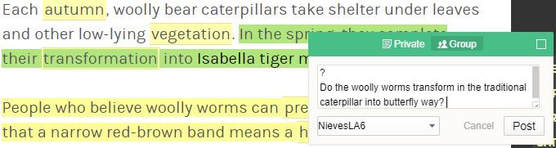 Group annotations How We Use it in ELA:
|
Katie Nieves@Ms_Katie Nieves Archives
December 2017
Categories |
 RSS Feed
